Regaining Access to FEIG RFID Readers
Every GlueLogix system is tested before shipping. All
components are configured and wired together to work out of the
box. Among other things, that means that FEIG RFID readers
have been changed from their original factory settings. But if
your FEIG RFID reader has been turned off for a month or more, it
may have lost the GlueLogix settings and reverted to factory
settings. In LineLogix PC, your feedback might read: "Reader
0 not found. Try resetting device and reopening reader." or
you might have the text below in your status bar:

In EncodeInMotion, you may have Setup failures. In I/O Box,
you may have all bad outputs. In CPR74, you will see one of
the red serial activity lights blink for RX data, but not the other
one for TX data, indicating that the reader is not responding to
commands. The LRU1002 may display a red error LED. If
those are your symptoms, you are in the right place.
This page will walk you through how to check if your reader has been
reset to default settings, and how to update it back to the desired
configurations. You will need FEIG ISOStart+ Software (this
should have come with your FEIG reader/GlueLogix system).
Identifying Serial COM Ports
The first thing to check is that you have the proper communication
ports selected, that the reader is powered on (you should see status
lights on the reader itself, but be careful - the CPR74 serial
activity lights will light even if the reader is off - check for the
green power light too), that the cables are all properly connected,
and your job settings are correct/have not been accidentally
changed.
If you are sure that you are communicating with the correct port,
with the correct settings, and the reader is still not responding,
it might be that the RFID reader has been reset to factory
defaults. An incidental reset to default settings is a
relatively common troubleshooting issue, and can happen after the
reader receives an accidental Reset command, or after a long period
of disuse.
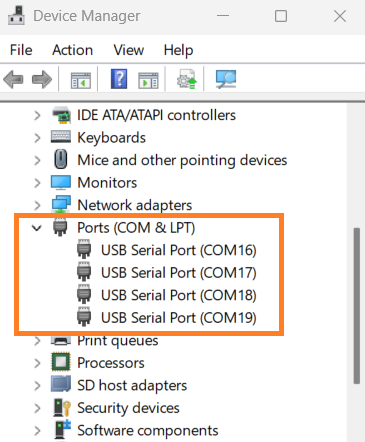
Different PC's will number Serial COM Ports differently, and it is
important to identify which you are using. Windows Device
Manager utility is an easy way to check. In the image below,
Ports 1, 2, 3, and 4 of a 4-port USB-to-Serial adapter have been
denoted with PC COM Ports 16, 17, 18, and 19. Therefore, an RFID
reader plugged into Port 1 corresponds Port 16 on the PC.
HF: Connecting and Configuring a CPR74 Reader in
FEIG ISOStart+ Software

Connect RFID Reader to PC and Power
Install and run ISOStart+
Click Detect Icon in Toolbar to bring up "Detect a
Reader" Window (Step 1 below). Set the COM-Port that
corresponds to the current reader (Step 2 below) and click the Detect
button (Step 3 below). When the reader is detected, click Run
without change (Step 4 below).

When Reader is connected, the next step is to read the current
configurations. Custom settings for GlueLogix are in CFG1:
Interface and Mode and CFG3: RF-Interface. Follow the
instructions below for manually changing CFG1 and CFG3
configurations.
Non-manual method: Alternatively, you may use the GlueLogix Standard
CPR74 setup file.xml to load the desired settings by clicking
the Open icon in the toolbar. You will still have to click
the [0x81] Write button separately for CFG3 and CFG1
in order to write new configurations. (Note: CFG1 must be configured
LAST. Write CFG3 first and then Write
CFG1)
Navigate to Configuration screen (Step 1 below), click CFG1
(Step 2 below) and click the [0x80] Read button (Step 3
below).

The CPR74 reader in the example above is set to default Baudrate 38400,
and default settings of 8 Data Bits, Even Parity,
and 1 Stop Bit, or 8E1, for short. If you click Read
and see the settings above, your reader has probably been reset
to its default configurations, and its configuration settings
need to be rewritten to reconnect with GlueLogix software.
Note: If your reader does not have the settings above, you should
stop here and keep investigating your connectivity issues.
The rest of this page is specific to readers that are currently
at default settings, and how to update them to desired
GlueLogix configurations.
To write new configurations in ISOStart+ enter the values in the
Green box below (115200 Baudrate and No Parity), and click the [0x81]
Write button to write to reader memory. You should see a
pop-up window saying that the Reader is performing a CPU Reset.
Confirm changes: When you have written new data to CFG1,
click the [0x80] Read button again to confirm your new
configurations.
Image below is a CPR74 reader at default CFG1 settings (Left) and
the standard GlueLogix settings (Right).

Navigate to CFG3: RF-Interface on the sidebar, and make the
changes below in green. When your settings are identical to the
GlueLogix configurations below, click the [0x81] Write
button to write the settings to the EEPROM of your reader.

Confirm changes: When you have written/configured CFG3,
click the [0x80] Read button again to confirm your new
configurations.
UHF: Configuring an LRU1002 Reader in FEIG ISOStart+ Software
The process for connecting to an LRU1002 UHF reader is much like the
CPR74 above. If you suspect your LRU1002 has been reset to factory
settings, detect and read it in ISOStart+ and check if has the
default configurations in the image below. If not, your connectivity
issues are unrelated. If it does, the settings must be rewritten.
The GlueLogix custom configurations for LRU1002 are more
comprehensive than the CPR74. The full list of custom settings is in
the image below, with defaults on the left, and GlueLogix settings
in Green to the right. If your LRU1002 has the settings on the left,
it has probably been reset to defaults.
Instead of changing settings manually, you may use the Standard
LRU1002 setup file.xml to update an LRU1002 configuration.
Once you have connected to your LRU1002 reader, click Open and load
the .xml file. This will have all the necessary settings for
GlueLogix devices. However, in order to update your reader, you must
click on each CFG section below and then click [0x81] Write.
Make sure you write CFG1 last, or you will lose connectivity
with your reader and have to reconnect. It is best to write every
other CFG first (CFG3, CFG4, CFG5, CFG16,
and CFG20) and then confirm your settings, then write CFG1
as a final step.

Copyright (c) 2026 GlueLogix Inc. All Rights Reserved.